Monday, July 29, 2013

Happy Birthday Sis!

Mornin' hens!  Today is my sister's 57th birthday. Woot-woot!  She's taking the week off and she's out shopping all day today!  Lil' booger!  I'm SO jealous!  Anywhoo, I made her this little card using a TiddlyInks digital image that I bought awhile back.  I knew when I saw this image that I wanted to use it for my sister's birthday card. People tell us all the time that we look SO MUCH alike, so I think it fits us to a tee!  Ok, so I printed the image onto some Classic Crest CS and colored it with my Copics.  Then I stitched the image to some DP from October Afternoon's Cakewalk collection.  Next I stitched that to some SU card stock and using my Perfect Layers was able to trim the SU Riding Hood Red mat PERFECTLY on all sides.  I suppose that's why they call it the Perfect Layers tool huh?  I adhered the panel to some SU Very Vanilla CS, rounded the corners, and added a button, twine and tag to the front.  That's about it!  I hope you hens have a GREAT Monday!


Supplies: Digital Image TiddlyInks "Wryn & Emmy"; CS - SU Very Vanilla & Riding Hood Red; Perfect LayersCopics; Twine. WeRMemory Keepers Corner Chomper; Button; Tag Die - Simon Says Stamps 

Wednesday, July 24, 2013

Happy Anniversary Babe!

Mornin' hens!  Today is my 30th anniversary with my DH.  Wow!  I can't believe it's been 30 years.  I must say, he's the bestest hubby a girl could ask for.  We started dating when I was in the 10th grade. I was crazy in love with him then, and I still am today!  Happy Anniversary Babe!

So here's the little card I made for him.  On a personal note, he absolutely hates mushy, wordy cards, so you have to keep his cards short and to the point.  LOL!  I started by embossing a piece of SU Very Vanilla CS with this cute Cuttlebug embossing folder and I also used my new Tim Holtz Embossing Diffuser plates.  The diffuser plate actually prevents a section of the embossing folder from embossing the CS.  I used the circle diffuser on this card.  Then I stamped this image from My Favorite Things into the un-embossed circle area.  I colored the image with my Copics and then the FUN began!  I love, love, love using Liquid Appliqué.  I can hardly wait for the stuff to dry so I can heat set it.  I know, I'm a little kid when it comes to this stuff, but I just love to watch it puff up.  Then I stamped the sentiment onto some scrap CS and adhered it to the front with a few pop dots.  To finish, I wrapped the card with some twine, added a wooden button and tied a bow to complete this simple clean design. I LOVE it!  I hope he does too! 


Supplies: Stamps - My Favorite Things; Cardstock - SU Very Vanilla; Copics; Wooden Button; Twine; Tim Holtz Embossing Diffuser Plates; Embossing Plate - Cuttlebug; We R Memory Keepers Corner Chomper

Oh, and I just had to share this card with you that Lil' Chick and Doug gave us for our anniversary. OMG!  I'm still ROFL over this one.  What a hoot (or should I say toot!).
It fits us to a tee!  Seriously, that's me!  Chubby legs, crazy hair, and of course ARTSY! And then there's the DH, well...... you get the point!  Bwah-ha-ha-ha-ha!


Now let me tell you about my weekend.  Lil' Chick and Doug asked us to come over and they wanted to make us dinner for our anniversary.  Lil' Chick was SO excited about this.  So we show up and I couldn't believe what they had done for us.  Why on earth I didn't take more pictures is beyond me... but anyway, she had her dining table all decked out with her fine china, table cloth, cloth napkins to match and this GORGEOUS bouquet in the center.  She had tea light candles burning on the side.  I'm telling you it was just stunning.  She made a Caprese salad (my FAV!) for an appetizer and then we had sparkling cider to drink, out of champagne glasses.  LOVED it!  Then for the main course Doug grilled Filet Mignon, and we had a sweet potato, tossed salad and rolls!  SHUT UP!  Seriously, it WAS the BEST meal I ever ate!  That steak just melted in your mouth, it was that good! For dessert, she had a cake made with fresh strawberries inside and buttercream frosting.  She topped that with vanilla ice cream.  OMG!  I thought I had died and went to heaven!!  Everything was just perfect!  Then if that wasn't enough, she presented us with this HUGE wrapped box. It was a Kuerig coffee maker.  Accccckkk!!  I have been wanting one of those FOREVER! Ok, I think I really am in heaven!!  God has truly blessed the DH and I with the most wonderful daughter and son in law EVER!  
Thank you both, it was just AMAZING!
Have a great day!    

Friday, July 19, 2013

Happy Birthday Andrew!

Mornin' hens!  Today is my nephew Andrew's 11th birthday.  Wow, where did the time go?  Seems like only yesterday he was just a baby.  Good grief, I'm OLD!! Ok enough of that...  Let's talk funny.  OMG!  Is this image a hoot or what?  SHUT THE FRONT DOOR!  I saw this image over at Squigglefly and went crazy over it.  You know some illustrators just have the talent of making a CUTE face and some, well.....  don't.  Well, the illustrator of these cows, NAILED IT!  Would you get a load of those eyes and nostrils.  OMG, it's the BEST!  I even love how they made the holes look 3D.  You currently get FOUR cows in this cow pack for $3!!  Uh-huh, four for $3.  Can't beat that!  Usually that's the price of one digital image.  Now hold on, let me finish before you rush off!  LOL!


I printed the image onto some Neenah Classic Crest CS and colored her with my Copics.  Then I cut her out and adhered her to this MME DP called "Garden Party" and stitched around the edges.  I matted the DP using my Perfect Layers tool and added a few baubles for some interest.  I originally had a bubbly bow tied with the saddle stitched ribbon but it was just too overpowering so I changed it to some Baker's Twine and a button.  Ahhh, much better!  I printed the sentiment from my computer and there ya have it!  Ok, now run on over to Squigglefly and get your cow patty, uh I mean cow pack!  Tee-hee!  Look out! It's a STAMPEDE!  Have a great day! 

Supplies:
Digital Image - Squigglefly; Copics; DP - My Minds Eye (Garden Party); CS - Stampin Up Early Expresso; Glossy Accents; Baubles; Button; Baker's Twine; Perfect Layers matting tool

Saturday, July 13, 2013

ConGRADulations Austin!

Mornin' hens!  Here's a little card I made for my good friend Jen's son Austin. He just graduated high school.  This image is from an older Cornish Heritage Farms set from Kim Hughes called U R A Hoot. Sadly, this company is no longer in business, but Kim does have her own company now called Paper Smooches.  I love her work.  CUTE, CUTE, CUTE!  Ok, so I started with embossing the front of my card.  However, I did not want to emboss the area where the image would go.  So I made six A2 size frames from card stock with the centers cut out.  Then I taped them together and placed them on top of the embossing folder when I ran it through my Cuttlebug.  Yoila!  The center is not embossed. Yay! Ok, then I made the brown frame using my Nestabilities and popped both it and the image up using SU dimensionals.  To finish, I tied on some Baker's Twine and then added a tiny '13 to his mortarboard.
Have a great day!


Supplies:
Stamps - "U R A Hoot" Cornish Heritage Farms, Sentiment Sampler - Paper Smooches;  Copics; Embossing Folder - Quickutz; Baker's Twine; Glossy Accents

Saturday, July 6, 2013

Introducing Perfect Tears


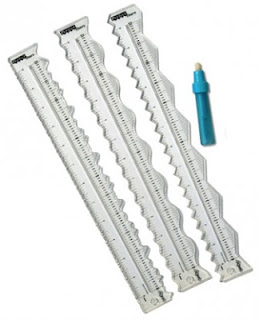
Mornin' hens!  So what do you think of Smoochie?  OMG, is she a riot or what?  Goodness I do LOVE this image.  Today I wanted to share a new tool called Perfect Tears.  I had never used a tool quite like this before so I thought I'd give it a whirl.  Now mind you, I  typically always have clean cut edges but I wanted to give this a go.  The 3 rulers in this set are designed for tearing paper and each ruler has two different edges.  For my project below, I used both the deckle and wave edges.  The set comes with a water pen which was the difference between night and day for me.  I tried to tear this MME DP which was quite heavy and was having no luck with a clean tear.  Then I used the water pen and the tearing was a breeze!  To my surprise, I really like this look.  And I like how the torn edges stand up a bit so it really adds texture to the layers.  


This image is from Tiddly Inks and she's called Smoochy.  I'm lovin' those lips!  You hens know I'm a sucker for any kind of farm animal.  Pigs, cows and of course CHICKENS are my favorites.  I colored Smoochy with my Copics and then matted her to some Stampin Up Basic Black CS with my Perfect Layers tool.  I printed her lips again and colored them a second time.  Then I added the second pair of lips on top for a GREAT 3D look.


Then came the hard part.  What kind of sentiment does a fat lipped cow have.  Oh my, that was crazy fun searching the internet for some ideas.  I finally stumbled onto this one and fell on the floor laughing.  What a GREAT birthday card for a girl friend, right?


And here's a close up of the results from the Perfect Tears tool.  See the little edges it leaves?  Sooooo cool?  OMG, I laugh at those lips every time I look at them. 

Here is what you get with the Perfect Tears set.  Currently, the set sells for $19.99 but you can get an extra 5% off your order if you use the code Jeanie5%

Have a great day!

Supplies:
Digital Image - Tiddly Inks; DP - My Minds Eye (Dilly Dally); Copics; CS - Neenah Classic Crest White, Stampin Up Basic Black; Ribbon - Papertrey Ink; Perfect Layers and Perfect Tears tools