Friday, February 28, 2014

Thanks a million!


Mornin' hens!  It might surprise you to know WHO I actually made this card for.  Wait for it…..  our local hospital!  What??  Yup, that's who it's for.  You see, I recently had a procedure done and was absolutely AMAZED at the level of care I received.  While I was only there for about 4 hours, I felt like I was at a 4 star hotel!!  Anyhoo, I just wanted them to know how much their kindness meant to me.  Each staff member went out of their way to ensure I was comfortable and had everything I needed.  Even when I mentioned I was craving my coffee (after not being able to eat or drink after midnight), within minutes my nurse was back with a hot cup of coffee for me.  All I can say is WOW!  I never expected such treatment.  Sooooo, I decided to make sure they knew how impressed I was.  I made this card for the staff and then bought a TON of cookies at the local bakery and stopped by the hospital and gave it to them.  Hopefully, they'll feel appreciated by this little gesture because I DO APPRECIATE them!  Ok, now this card came together pretty easy.  I started by stamping the image onto some Neenah Classic Crest CS and colored it with my Copics.  Then using my circle Nesties, I cut the image out but sponged some chalk ink around the edges before removing from the die.  Next, I stamped the THANK YOU background stamp onto some SU Basic Black CS and heat embossed it with some white embossing powder.  Then I cut the design out using my Stampin Up Top Note die and matted it with some black cardstock.  To finish, I added some Glossy Accents to his eyes, and some black grosgrain ribbon tied into a little bow.  Okee dokee, there ya have it!  I hope you hens have a FABULOUS Friday and I'll see ya back in the hen house real soon.  {{{hen hugs}}}

Supplies:
Stamps - Inkadinkadoo (Robber) and Hero Arts (Background); CS - SU Basic Black, New Leaf - Paper Trey Ink, White - Neenah Classic Crest; Copics; Mini Brad - Michaels; Button; Ribbon - Offray; Border Punch - Fiskars; Glossy Accents; Embossing Powder - Zing; Corner Chomper; Top Note Die - Stampin Up; Nestabilities

Tuesday, February 25, 2014

With Sympathy


Mornin' hens!  I have to admit, as much as I LOVE card marking, this is not the type of card I enjoy making.  Although, knowing that it may bring my friend comfort to know she is being thought of, makes it all worth while.  The card was quite simple to make actually since there was no coloring involved.  I embossed the DP with the same damask pattern as the DP and then matted it to some green CS using my Perfect Layers tool.  Using my Spellbinder Nestabilities, I created this nested label with the black and green cardstock, and patterned DP.  The sentiment is from an older Taylored Expressions set and I just added a few brads for interest.  I adhered the sentiment with a few dimensionals in between the layers and then finished by adding the black satin ribbon tied in a sweet bow.  Okee dokee, that's it for me today.  I hope you hens have a TERRIFIC Tuesday and I'll see ya back in the hen house real soon.  
{{{hen hugs}}}

Supplies:
Stamp - Taylored Expressions; CS - SU Basic Black, Green - DCWV; DP - My Minds Eye "Traveler"; Mini Brads - Michaels; Ribbon - Offray; Embossing Folder - Cuttlebug; Perfect Layers Tool

Friday, February 21, 2014

Happy Anniversay!


Mornin' hens!  Here's a little card I made for a coworker who requested an anniversary card.  I think it turned out so STINKIN' cute!  This stamp is from Paper Pretties.  The stamp itself is quite large and features the full body of each person, with all sorts of cute things to put in the fella's hand (e.g. candy, ring, etc.)  It's a great anniversary or Valentine's Day stamp set to have on hand.  Ok, so I stamped the image onto some SU Very Vanilla CS and colored it with my Copics.  I cut a heart out of this DP and then placed the image behind the DP adding a few dimensionals for a nice 3D look.  I added a few scalloped borders below, cut from some coordinating DP, and then matted it all on some SU Early Expresso CS, using the Perfect Layers tool, and stitched around the edges.  To finish, I added a few pearls, tag, punched hearts and a satin bubbly bow!  That's it for me today!  I hope you hens have a FABULOUS Friday and I'll see ya back in the hen house real soon! 

Supplies:
Stamp - Paper Pretties Stamps; CS - SU Early Expresso & Very Vanilla; Ribbon - SU; Lace - Walmart; DP - My Minds Eye "Dream"; Pearls - Michaels; Punches - EK Success, Martha Stewart; Perfect Layers Tool

Tuesday, February 18, 2014

A "Beary" Special Birthday!


Mornin' hens!  Hope you all had a GREAT weekend and SWEET Valentine's Day!  I made this little card using an older set from The Cat's Pajamas. The present and hat are just add ons.  I colored him with my Copics and cut him out leaving a small white border.  I adhered him to this DP with a few dimensionals.  I used my Perfect Layers tool to mat each piece of DP onto some SU Early Expresso CS and then I stitched around the edges.  To finish, I added some green Stickles to the present and tied a bow with this striped grosgrain ribbon.  That's it for me today.  I hope you hens have a TERRIFIC Tuesday and I'll see ya back in the hen house real soon.  {{{hen hugs}}}

Supplies:
Stamps - The Cats Pajamas; CS - SU Early Expresso & Kraft, DP - Bo-Bunny "Camp-a-lot", Ribbon - Grosgrain-StampSimplyRibbon, Burlap-Michaels; Stickles; Perfect Layers Tool

Friday, February 14, 2014

You're TOAD-ally awesome!


Mornin' hens!  I made this little card for my new Son in Law!  Honestly, I couldn't have got a better one if I had taken applications and hand picked one myself!  Yup, he's just that GREAT!  Soooo, why not tell him so, right?  Everybody likes a pat on the back!  I saw this little stamp and decided to make a play on the word TOAD-ally, and since it's a boy, I thought it would be perfect!  I stamped the image onto some Strathmore watercolor paper and watercolored it with some distress markers.  My new favorite coloring method.  Next, I cut the image out with my rectangle Nestabilities and sponged some chalk ink around the edges before removing the die.  I have a video on this HERE.  Using my SU embossing folder, I embossed this frame on a separate piece of SU Kraft and popped it up with a few dimensionals.  Then I adhered the image panel to some matching DP using my Perfect Layers tool.  To finish, I added some Glossy Accents to the toad's eyes, and then tied on some twine with a button on top!  That's it for me today.  I hope you hens have a FABULOUS Friday and a WONDERFUL weekend and I'll see ya back in the hen house real soon!  {{{hen hugs}}}

Here's a close up!


Supplies:

Stamps - Whipper Snapper Designs; CS - SU Kraft; Distress Markers - Ranger (Tim Holtz); Glossy Accents; Twine; Button; Perfect Layers Tool; Embossing Folder - SU; DP - WeRMemory Keepers "Grandma's Kitchen"; Spellbinders Nestabilities

Wednesday, February 12, 2014

Happy Bird-day!


Mornin' hens!  Today is Lil Chick's HALF birthday!  Oh yeah, we celebrate half birthdays too!  (Hey, any chance to get more presents, I'm in!)  snort!  So here's the little card I made for her special day.  I stamped this adorable Penny Black image onto some Strathmore watercolor paper and colored it with my distress markers and water brush.  I stamped the sentiment from Paper Smooches with Versamark ink and heat embossed with white embossing powder.  To finish, I added these little button brads and rounded the top corners.  Me loveeeeeee!  Okee dokee, that's it for me today.  I hope you hens have a WONDERFUL Wednesday and I'll see ya back in the hen house real soon!  {{{hen hugs}}}

Supplies:
Rubber Stamp - Penny Black; CS - SU Kraft; White Embossing Powder - Zing; Distress Markers - Ranger (Tim Holtz); Brads - Michaels; DP - My Minds Eye "Blink of an Eye"; Spellbinders Nestabilites; Ink Pads - Versamark & Stazon

Friday, February 7, 2014

Love is in the air!


Mornin' hens!  I hope you've had a good week.  Here's a little card I made using an older Stampendous stamp I had in my stash!  Remember me telling you hens that I was going to try and use some of my older supplies this year?  Well, I decided to dig through my box of wood mounted stamps (remember those?) and found this little cutie, so I couldn't resist. Tee-hee!  Of course, I colored him with my new found love DISTRESS MARKERS!  Acccck!  I LOVE them!  This was a pretty simple card to put together too!  After I colored the image I cut it out with my circle Nestie and then matted it with my scalloped circle Nestie. I made the lower panel from four different patterns of DP and matted them to a rose colored piece of card stock using my Perfect Layers tool. Then I stitched around the edges and tied a double bow with some aqua taffeta ribbon. To finish, I added some Glossy Accents and glitter (using my Wink of Stella glitter pen) and rounded the top right corner.  That's it for me today!  Hope you hens have a WONDERFUL Weekend and I'll see ya back in the hen house real soon!  {{{hen hugs}}}


Here's a close up!


Supplies:
Rubber Stamp - Stampendous; Nestabilities; Distress Markers - Ranger "Tim Holtz"; DP - Echo Park "So Happy Together"; Glossy Accents; Wink of Stella Glitter Pen - Clear; Ribbon - Martha Stewart; CS - SU Whisper White, Rose - Unknown; Border Punch - Fiskars; Perfect Layers Tool

Reminder: When ordering from Perfect Paper Crafting, be sure to use discount code Jeanie5% for a 5% discount off your order.


Tuesday, February 4, 2014

Somebunny Loves You!

Mornin hens!  Isn't this card GREAT?  OMG, I'm in LOVE with it!   I made this card for Lil' Chick and Doug for Valentine's Day.  All together now, awwwww….  {snort!} 
Ok, so here's the BEST part, I watercolored it!  OMG! OMG!  I'm so proud of myself!  Smiley  I just LOVE this look!  I think I'm hooked!  Seriously, this was my first attempt and I just can't get over it.  Ummmm, can ya tell I'm a little bit excited?  Uh YEAH!  Now I have to admit, Kristina Werner made it look so simple, I had to give it a try, and boy am I glad I did!  Thanks for the inspiration Kristina!  Ok, so I started with stamping the image onto Strathmore watercolor paper, and then using my new Tim Holtz Distress Markers, I watercolored the image. Woot-woot! Then I cut the image out using my rectangle Nestabilites and leaving the die in place, I sponged some chalk ink around the edges.  Here's a video I made awhile ago on this technique.  I matted the image with PTI Pure Poppy card stock, cut using my scalloped rectangle Nestie die.  I matted all the other DP panels using my nifty Perfect Layers tool and then stitched around the edges of each panel.  I stamped the sentiment onto a scratch piece of card stock with some Versamark ink and then sprinkled some white embossing powder over it.  Then I heat set the powder and cut the piece into a banner shape and adhered it to the bottom of the card with a few dimensionals.  To finish, I added some Glossy Accents and some glitter (using my Wink of Stella glitter pen) to the hearts.  Okee dokee, that's it for me today!  I hope you hens have a TERRIFIC Tuesday and I'll see ya back in the hen house real soon!
{{{hen house}}}


Here's a close up!
Supplies:
Rubber Stamp - Penny Black, Stamping Bella (sentiment); Distress Markers - Ranger "Tim Holtz"; Watercolor Paper - Strathmore; Chalk Ink - Colorbox "Lime"; DP - October Afternoon Sidwalks, Nestabilities; Embossing Powder - Zing, CS - SU Very Vanilla, PTI Pure Poppy; Glossy Accents; Wink of Stella - Clear; Waterbrush - Faber-Castell

Reminder: When ordering from Perfect Paper Crafting, be sure to use the discount code Jeanie5% to receive a 5% discount on your order.

Saturday, February 1, 2014

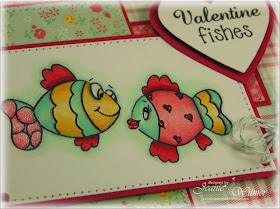
Valentine Fishes


Mornin' hens! I've been chosen to be the Guest Designer this month for Perfect Paper Crafting.  Yay!  So here is my card that made for them to display on their Facebook page.  OMG, I feel like a celebrity. Woot-woot!  Anyhoo, here's how I made this little cutie.  First, I stamped this adorable image from Gina K. Designs onto some Stampin Up Very Vanilla card stock and colored them with my Copics and added a little shading around the image with colored pencils.  I added some red Stickles to the little hearts on the girl fish and also used my Wink of Stella glitter pen on her middle section and the tale of the boy fish.  Love that pen! I also added some Glossy Accents to both her lips and the eyes.  Next, I matted each pattern of designer paper onto some Pure Poppy card stock using the oh so handy Perfect Layers tool.  If you've never tried this tool before, it's amazingly easy and gives such a clean look.  It's always been difficult for me to measure my mat by just adding 1/8" or 1/4" more each way and then try to adhere my piece onto the center of the card stock.  Sounds easy enough but it never seems to be even on all sides once I stick it down.  Am I right?  Well, that's where this tool comes in.  You actually adhere the piece you want to mat onto a larger piece of card stock first, and then place this tool on each side and make the cut!  Presto! Perfect mat every time!  Click HERE for a quick video on how this tool works!  Ok, then I printed the sentiment on a scrap piece of card stock and cut it out with my Stampin Up heart die.  I didn't have the next size larger die, so I just took the die I used and drew the outline onto some scrap Pure Poppy card stock and cut it out.  To finish, I tied some aqua Baker's twine around the bottom, added a few mini brads and there ya have it!  I plan on giving this little cutie to my DH!  I hope he likes it!  Hope you hens have a Wonderful Weekend and I'll see ya back in the hen house real soon!  {{{hen hugs}}}


Here's a close up!

Supplies:
Rubber Stamp - Gina K Designs; Copics; Prismacolor pencils; Heart Die - Stampin Up; Glossy Accents; Stickles - Red; Wink of Stella pen - Clear; Baker's Twine; DP - October Afternoon - Cakewalk; CS - Papertrey Ink -Pure Poppy, Stampin Up - Very Vanilla; Perfect Layers Tool 

Reminder: When ordering from Perfect Paper Crafting, be sure to use the discount code Jeanie5% to receive a 5% discount off your order!