Thursday, July 2, 2015

You're Fan-Tastic!

Mornin' hens! 
Here's another CAS card I made.  Super simple but none the less CUTE!


What I really was excited about on this card was the fine little dotted frame I made.  I did this using the Silhouette Designer Edition software.  You just make a frame, and then click on the line style to make the line a dashed line, and then click on round the corners of the dashes.  Just by rounding the corners of the dashes makes it look like dots!  Woot-woot!  You can then adjust the size of the dashes, so I made them really small so they look like pin dots.  I did the same thing for the circle and oval, and then sent the design to the printer.  Next, I stamped the fan image onto a separate piece of cardstock and colored it with my Copics.  I adhered a few pieces of patterned paper to the panel and stamped the image within the dotted circle using my MISTI.  I die cut the colored image using a circle die and then adhered it inside the dotted circle with foam tape.  By stamping the image underneath the die cut circle, directly on the panel, I could get the right placement of the electrical cord using the MISTI.  To finish, I added some teal bakers twine around the bottom and tied it in a bow.  Okee dokee, that's it for me today.  I hope you hens have a TEE-RIFIC Thursday!
{{{hen hugs}}}

Supplies:  


Wednesday, July 1, 2015

EK Tools Bow Maker

Mornin' hens!  
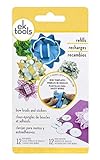
Have you hens seen the EK Tools Bow Maker yet?  OMG!! You hens know how much I love to wrap, so this little gem was right up my alley.  But.....(and that's a BIG but!) I was NOT happy with the bow it makes using the instructions.  Actually, it was down right SAD!  So I added my own little finesse to it and now I LOVE it!  I thought you hens might be interested in how to do this yourself.  
If so, well here ya go....


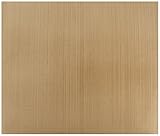
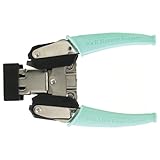
Ok, so first off you need this little tool.  The bow here was made using the MEDIUM tool.  The finished bow is approximately 3.75" in diameter.   


The package directions state to use .50" x 72" strip of material, so I had assumed you needed one long strip of material.... (At this point, I was already anticipating returning it if I had to glue strips of paper together!  Uh, NO!).  But after watching a few YouTube videos (HERE) I soon figured out it was multiple short strips of paper - and they weren't glued together at all.  Yay!
Ok, so here's how I cut my paper.  


I've created a template below if you would like to download it for future use.

Ok, so I used an 8x8 sheet of double sided paper.  If you're using a 6x6 paper pad, you'll need two sheets. Or one half of a 12x12 sheet of paper.   Whichever size you use, you'll need the following:
 15 - half inch strips x 6 inches long
3 - half inch strips x 4 1/2 inches long
1 - half inch strips x 3 inches long  
To start, insert the brad that comes with the tool, in the center of the tool.  Start by piercing the first strip about a half inch from the end and then loop around and under the NUMBER 1 finger on the tool.  Secure the loop in place by piercing the strip onto the brad, keeping the loop taught on the finger.  Trim any excess length from the paper strip after the piercing.  I left about a half inch tail after the piercing.  Note: Each of the 15 strips of paper will make only one loop around one finger of the tool.  Now take another strip and do the same to the NUMBER 2 finger, and continue all the way around until all 5 fingers are completed.  Now do two more rounds so that each finger has 3 strips of paper on each one.  
Ok, now this is where their instructions stop, which is really weird, because it leaves a big 'ol hole in the center.  If you watch the YouTube video you'll see what I mean.  Anyway, go ahead and place the round double sided sticker from the kit on the bottom of the bow and separate the brad prongs to secure.  Now you can take the bow off the tool by gently bending the fingers downward and sliding the paper off.  Separate the three loops on each finger and twist the row of loops left or right so the loops are offset.  Place the bow on your work surface right side up so you can finish adding the remaining loops to the "empty" center.  You'll have four paper strips left at this point.  Take one of the 4 1/2" strips and bring both ends together making a manual loop, just like you were doing before but without the tool.  I poked a hole about a 1/2" to 1" from the ends and then pressed it down on top of the brad in the center of the bow.   (Note: The brads in the kit have prongs on the bottom and top)   Ok, now do the same for the other two 4 1/2" strips.  And last but not least, just roll the 3" strip into a small ring and pierce it directly in the center to cover the brad.  To finish, press all the layers together really well and separate the brad prongs to secure all four strips you just added.  And that's it!  It sounds more complicated then it really is.  I really love the look of a paper bow and I think it adds that personal touch to a beautifully wrapped gift.  My mind is going crazy with of all sorts of cute wrapping ideas for these little beauties, not to mention using up a ton of scrap paper. 
Woot-Woot! Okee-dokee, that's it for me today. I hope you hens have a WONDERFUL Wednesday! (((hen hugs)))

Supplies:

Monday, June 29, 2015

American Flag Wood Blocks

Mornin' hens!
I saw this idea on Pinterest HERE, and decided to give it a try but with a slightly different look.
While the polka dots are super cute, I wanted to have the blocks look more like a real American flag.  So here's what I did....


The blocks are actually made from a 4x4 post.  The DH cut them into 7" pieces for me and then I sanded each to remove any splinters.  Next, I applied two coats of white spray paint to all three blocks and I let that dry for about 30 minutes.  To make the white stripes, I applied 1" painters tape (2 stripes to only the bottom portion of the first block, and 4 stripes to the second and third blocks).  You'll also want to cover the entire top area of the first block for this step.  Then I applied two coats of red spray paint.  I let that dry for about 30 minutes as well.


Now you can pull off all the painters tape and... here's the fun part - TADA!  Your stripes magically appear.  Tee-hee!  Ok, now for the stars.  You'll want to tape off the bottom 3 stripes on the first block to avoid overspray.  Then I cut 1" star masks from vinyl using my Silhouette Cameo and adhered 5 of them on each side.  Then I applied two coats of navy blue spray paint.  After about 30 minutes, I pulled off the star masks with tweezers and then removed the painters tape. To finish, I distressed them a bit with sandpaper and tied a bow with some jute twine.  AWESOME sauce!!  The DH was able to cut 9 blocks from the one pole he bought, so I made 3 sets of these.  July 4th is one of Lil' Chicks' favorite holidays, so I know she'll love these.  The third set was for my sister.  Okee dokee, that's it for me today.  I hope you hens have a MAHVELOUS Monday!  {{{hen hugs}}}

Supplies:    


Monday, June 22, 2015

What can YOU do?

Mornin' hens!
Uh huh, another baby on the way!!  Ok, now I'm beginning to worry about the water 'round here....
Bwah-ha-ha-ha! This card is for Lil' Chick's besty.  She just found out she's expecting so I couldn't wait to make her this card.  Ain't it a hoot??


I just LOVE this card.  I started by printing the digital image onto the card base using my EVER SO FABULOUS printer.  You hens know how much I LOVEE this printer, and printing digital images directly onto the card base (110lb cover stock that is...) is a piece of cake.  And of course, the awesome thing about digital images is that you can resize the image to be whatever height/width you want.  I decided 3.5" tall would be perfect for this A2 size card.  After I colored the image with my Copics, I masked the image and applied the distress inks using the dotlets stencil.  After applying the distress inks, I then added translucent embossing paste.  OMG, it looks so cool in real life with the dots raised and shiny.  Ok, so next I drew black circles around a few of the dots for a little added interest, and then rounded the two bottom corners. To finish, I added some sequins and tied a double bow with some teal baker's twine.  Oh and I almost forgot, I HAD to add a little Glossy Accents to her glasses and lips too!  Tee-hee!  Okee dokee, that's it for me today.  I hope you hens have a MAH-VELOUS Monday!  {{{hen hugs}}}

Supplies: