Thursday, July 31, 2014

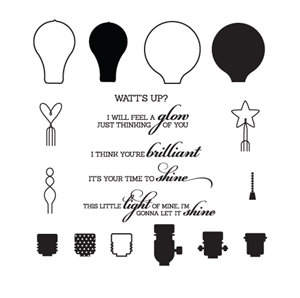
It's your time to shine!

Mornin' hens!  I made this card for a coworker of mine.  She needed a card for a girlfriend who was graduating and she told me they have this little saying between them, "hey girl hey!", and asked if I could incorporate it into the card somehow.  So, this is what I came up with!  Ain't it brilliant??  Bwah-ha-ha-ha!  Hope she likes it!


The lightbulb has an embossed base to resemble metal and I die cut a piece of transparency and adhered it on top of the light bulb so it would be shiny.  I was afraid to use Glossy Accents as I thought it might warp the paper using so much of it.  I stamped the rays and then adhered the light bulb with some foam tape.  I stamped the sentiment below and added some Wink of Stella pen to each ray for some added shimmer.


Okee dokee, that's it for me today.  I hope you hens have a great day!  {{{hen hugs}}}

Supplies:


Tuesday, July 29, 2014

Happy Birthday Teresa!

Mornin' hens!  Today is my sister's birthday.  Woot-woot!  Hope you have a great day sis!
This is the little card I made for her.  I just fell in love with this image when I saw it and thought it would be perfect for her card.  It reminds me of Norman Rockwell art, which I love....  Anyhoo, I stamped the image onto some Neenah Desert Storm card stock and paper pieced the image using patterned paper.  I colored the skin, hair and balloons with my Copics onto some Neenah Classic Crest white card stock and pieced these areas onto the Desert Storm card stock as well.


I stamped the sentiment onto the same patterned paper and folded it into a banner shape below the image.  To finish, I rounded the corners, added some Glossy Accents to the balloons, and grounded the image using colored pencils and Gamsol.  The red hair freckled face girl is ME!!  LOL!  Okee dokee, I hope you hens have a great day!  {{{hen hugs}}}

Supplies:


Thursday, July 24, 2014

Appliquéd Throw

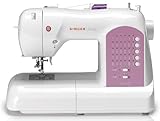
Mornin' hens!  Just wanted to share with you the throw I made for Jaxon!  This was my very first attempt at appliqué and using a satin stitch too!  Woo-hoo!  I'm so pleased with how this turned out.  Lil' Chick wanted the nursery colors to be gray, navy, white, and red.  She ordered the chair in navy and I thought, "Hey, wouldn't a red throw be great on that chair, and you could snuggle under it with Jaxon in the middle of the night?"  You betcha!!  So, off I went to Hancock Fabric and picked up some red fleece, a cotton square in a cute navy pattern, navy thread, navy embroidery thread, and some sewable Heat Bond.   I started by applying the Heat Bond to the the navy fabric and then cut the letters of Jaxon's name using my Silhouette Cameo.  Then, I cut the red fleece material into two equal sized pieces and I ironed the letters onto one side.  Next, I laid some tissue paper under the red fleece and applied a satin stitch around each letter with my sewing machine.


To finish, I pinned the second piece of fleece to the back and using a blanket stitch, stitched the two pieces of fleece together.  Isn't it cute??  I also bought Jaxon this little Gund bear too!  I added some red grosgrain ribbon around his neck to match the room!  Below is a picture of the nursery so far.  The DH still has to hang the sign we made and Lil Chick has a few other cute things to hang as well.  I can hardly believe it's almost time for me to meet my new grand baby!!  Yippee!!  


Okee dokee, that's it for me today.  I hope you hens have a great day and I'll see ya back in the hen house real soon!  {{{hen hugs}}}

Supplies:


Monday, July 21, 2014

IOU!

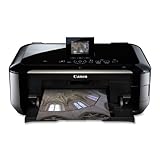
Mornin hens!!  Here's one last card I made for Lil' Chick's baby shower.  I made this card using my Silhouette Cameo.  I don't know what I would do without this machine.  It makes crafting such a breeze!  If you happen to be on the fence about buying the Silhouette Cameo, trust me - you won't be disappointed.  It's like no other cutter out there.  No cartridges to buy (or storing them) and you only purchase the images you want.  The images run about $.99 cents each, or you can get a subscription to the Silhouette on line store and get them even cheaper.  Seriously, my three favorite items in my craft room right now are my Mac, my Silhouette Cameo, and my Canon MG6220.  Honestly, it's the BEST printer I've ever had - and I've had plenty!  It will feed 110lb cardstock through with no issues at all.  It prints crisp and clean every time and I've never had a paper jam.  I've had it for 7 months now and finally replaced my first ink cartridge.  LOVE, LOVE, LOVE this printer!  But don't delay if you're interested in buying it.  This model is being discontinued and the newer models don't have the rear paper tray option.  The MG6220 can feed both from the tray underneath and from the rear tray if needed.  This is essential for printing on heavy cardstock.  It's one of four home printers recommended by cardstock companies.  If you're interested, I've put the links at the bottom of the post. 


Ok, so I began by printing the sentiment on the bottom of the card first and then I began decorating it.  I paper pieced the images cut with the Silhouette Cameo and added foam tape between a few layers for some dimension.  Nothing too fancy but I LOVE the way it turned out. 
The sweet baby boy DP is really old and I'm afraid all I had left was a half of a 12x12 sheet so I'm not sure of the company.  Using my printer, on the inside of the card I printed, "Pucker up, this is gonna take some time!"  Poor Lil' Chick, she's had such a rough time of it.  I feel so bad for her that she was so sick for the majority of her pregnancy.  And here I was only sick one day!  Bless her heart!  

Okee dokee, that's it for me today!  I hope you hens have a great day!  {{{hen hugs}}}Supplies: