Saturday, June 29, 2013

Suh-weet Lil' Madilyn!

Hi hens!  Just thought I'd pop in today and share this little card I made for my SUH-WEET niece Madilyn.  This digital image from the "Avery is Thankful" collection, is from Sassy Cheryl's Stamps.  She has some SERIOUSLY CUTE images over there.  You hens need to go take a look, but don't say I didn't warn you. LOL!  Ok, so I printed the digital image onto some Classic Crest CS and colored her with my Copics.  I stitched all the panels and made this cute rosette with my Tim Holtz die.  I bought this die probably a year ago and I've never tried it out.  I LOVE it and it was so easy to do too!  I'll definitely be using this die again soon.  Have a great day!


Supplies:
Digital Image - Sassy Cheryl's Stamps; CS - Neenah Classic Crest; Rosette - Tim Holtz Alterations; Border Punch - EK Success; Stickles; Copics; DP - Echo Park; Perfect Layers matting tool

Monday, June 24, 2013

Happy Birthday Stacey!


 Today is my sister in law's 42nd birthday.  She's a wonderful SIL and the BESTEST mother ever!  Talk about being prepared....  this gal has it ALL!  I swear she comes prepared for everything!  Need a Bandaid, she's got it!  Need a safety pin, she's got it!  Need a cold drink or snack, she's got that too! Seriously, I think she carries a 7-11 in that purse of hers!  LOL! My niece and nephew are two of the greatest kids ever... and it's because they have such a GREAT mom!  Oh yeah, and they've got my brother too!  Bwah-ha-ha-ha!  Just kidding!  My brother knows I wuv him bunches!  Anywho, Stacey is a DIEHARD coffee drinker (like me!) so when I saw this phrase on Pinterest, I knew I HAD to use it for her card.  I have to tell you this little story about Stacey.  While on a family camping trip, my mom made coffee for everyone during breakfast.  Of course we all drank a few cups and went about our day biking, hiking, etc.  Around noon, Stacey said, "I'm not feeling well, I think I'll go lie down." After a few hours she came out of the tent and said, "I have the worst headache EVER!"  So she took some Tylenol and was feeling better by the evening.  Later that evening, as we're sitting around the campfire, mom makes some more coffee for everyone but this time Stacey happens to be watching her and all of a sudden Stacey shouts, "DECAFFEINATED??  Are you kidding me?  No wonder I'm feeling so bad!"  LOL!  Of course my mom was like, what's wrong with decaffeinated?  Like you have to ask!  OMG!  So that's one of our many funny camping stories and now my mom is banned from making coffee for everyone unless she uses "LEADED" as my brother likes to call it!  


I made this card using "Morning Margaret - Have a nice day!" from Bugaboo Stamps.   OMG, isn't she a hoot!  You hens know how much I love funny people images, so Margaret is right up my alley.  Margaret, Mildred and Stella are my favs!  I printed the image onto some Classic Crest CS and colored her with my Copics.  I printed the sentiment and then stitched around the edges of each panel.  I added a little shading to the edges with some distress ink and tied a bubbly bow with this sheer dotted ribbon to finish it off.  That's it for today.  I hope you hens have a good Monday! 


Supplies:
Digital Image - Bugaboo Stamps; Copics; DP - Echo Park; Ribbon - Offray; Buttons; CS - Stampin Up Early Expresso; Glossy Accents; Twine; Distress Ink (Vintage Photo) - Tim Holtz; Perfect Layers matting tool

Friday, June 14, 2013

Happy Father's Day to my DH!


Hi there!  Just thought I'd pop in and show you this little cutie I made for my DH!  I just ADORE this image.  It's SO STINKIN cute!  I stumbled upon this illustrator while looking for a cute digital Father's Day image.  You know how that goes, masculine images are among the hardest to find, right?  Anyhoo, this image is from Birdie Brown.  You have GOT to go take a look at her images.  They are to die for!  I know I'm hooked!  She also features FREE images as well.  Woot-woot!  In fact, this little cutie was among her FREEBIES!  What?  Yup, you read right!  It's under the FREEBIES tab at the top of her blog. I'm entering this card into the Top Tip Tuesday challenge, as it just so happens that Birdie Brown is the sponsor.  I'm SO hoping to win some of her cute images.  The theme for the challenge is Masculine.  I think this little guy fits right in, don't you?  Ok, so I started by printing my image onto some Neenah Classic Crest CS and colored him with my Copics.  I cut the image out and used some SU dimensionals on the image and frame for a cool 3D look.  The frame was cut using my Nestabilities die and of course my perfectly trimmed mats were cut using the Perfect Layers rulers.  


MY TOP TIP - When cutting out an image, leave an 1/8" white border to make the image POP! I cut my images out using small crafting scissors, but remember to turn the image while cutting, not the scissors.  This helps with not bending or curling the edges of the image.

Supplies:
Digital Image - Birdie Brown; CS - Neenah Classic Crest, SU Early Expresso & Soft Suede, DP - MyMindsEye (Blink of an Eye), Twine, Button, Copics, Sakura Glaze Pens, Nestabilities, Perfect Layers 

Monday, May 27, 2013

Happy Father's Day!

Hi there!
Here is my Father's Day card for my Dad.  This fits my dad to a tee!  Ever since he retired, he's such a ham!  He reads all day or just sits on the porch and watches the birds, oh and he brags too!  Uggggh!  Needless to say, I'm jealous! I can't imagine a life without an alarm clock and sleeping in late EVERY day!  Oh yes, one day I'll be there, and I'm gonna be the ultimate RETIREE!  You just wait and see!  {snort!} Anyhoo, for today's card I used this cute little stamp from Maui Cows (sorry, they're no longer in business) and colored him with my Copics. Next, I matted the image with some green CS.  Matted you say?  Wanna know how to make the PERFECT MAT? Well, while making this card, I tested out a clever tool that I was sent to review. It's called Perfect Layers.  Have you hens heard of this?  Well, it's quite clever, I must say.  It makes the mats for your images absolutely PERFECT!  Um, I guess that's why they call it Perfect Layers, huh?  Now I have to confess, I usually just eyeball my mats, or cut them a 1/4" bigger than the image and presto I'm done.  But I will say, they're never straight or even all the way around.  I'm not sure if my cutting board is askew or what, but they never seem straight anymore.  Well, this little tool solved all that and it's super easy too.  After I colored my image, I adhered it to a piece of green CS and then using this tool and an exact knife, cut each side.  The edges are so clean and exactly the same distance all the way around.  LOVE IT!  Click HERE for a little video from the manufacturer on how they work and a 5% discount too!  Woot-woot!  I'm super impressed.  Ok, so next I cut the leaves with my Silhouette Cameo and attached them with Stampin Up dimensionals.  I threaded some Baker's twine from the hammock to the leaves so it would look the hammock was actually hanging. Seriously, this is SO my dad. LOL! Next I added two orange eyelets and threaded some ribbon through and tied it in a little bow.  To finish, I added the computer generated sentiment and that's about it!  Hope you hens are having a relaxing weekend!
Happy Memorial Day!  God Bless America!  


Supplies:
Stamp - Maui Cows; Leaves & Pointed Circle - Silhouette America; Ribbon - Michaels; Copics; Neenah Classic Crest CS; Eyelets; Baker's Twine;Perfect Layers

Sunday, May 19, 2013

Happy Birthday Lily!

Mornin' hens!  This little card is for my SUH-WEET little grand dog Lily! The DH and I just love her to bits!  When Lil' Chick comes home to visit, we ask "Are you bringing Lily?" and then let out a big sigh when the answer is "No".  The DH tells Lil Chick, "Go back home and get her!"  LOL!  The little baby is a whopping 4 years old!  Wowzers!  Where does the time go! Anyhoo, I made this little card for her big day.  This image is from Stamps by Judith.  I colored the image with my Copics and paper pieced the image onto this DP from October Afternoon.  The little gift tag did read "For My Favorite Human" but I blocked off human and wrote in Grand Dog!  Tee-hee!  I rounded the bottom of the vertical piece by sliding the paper through the punch upside down to cut only one side.  I stitched around the edges of all pieces and then tied this mint green grosgrain ribbon into a cute bubbly bow.  Have a great day!  {{{hen hugs}}}


Here's the inside!  LOL!


Supplies:
Stamps - Stamps by Judith; Copics; CS - Yellow and White; Grosgrain Ribbon - Papertrey Ink; Punches - Marvy and Stampin' Up

Sunday, May 12, 2013

Happy Mother's Day to my FMIL!

Mornin' hens! What's a FMIL you ask?  Well that's my nickname for my Favorite Mother In Law!  Tee-hee!  I call her my FMIL and she calls me her FDIL!  LOL!  I really do have the BESTEST MIL ever!  She's such a blessing to me and has the BIGGEST heart.  Love you bunches Midgee!! I hope you have a wonderful Mother's Day!  
I thought this would be a cute card for her since my DH was a bit of a booger as a kid so I thought she'd get a kick out of this image.  Looks like something my DH would do. LOL! I can just see him pulling up flowers from a flower bed to give to his mom.  (snort!) Ok, so this image is "Guilty Jack" from Ladybug Crafts Ink.  Kerry currently has this stamp on sale at 70% off!  Get 'em while they last!  I stamped Jack onto some SU Very Vanilla and then colored him with my Copics.  I cut him out with my circle Nestabilities and matted him with scalloped my Nestabilities using SU Cherry Cobbler CS.  I stitched the DP from My Minds Eye (On the Sunny Side) to some SU Very Vanilla and then tied on this crocheted ribbon.  To finish I printed this sentiment and punched it out with my tiny tag punch.  Have a great day!  {{{hen hugs}}}
  

Supplies:
Stamp - Ladybug Crafts Ink; Copics; DP - My Minds Eye (On the Sunny Side); Crocheted Ribbon - SU; Nestabilities; Tag Punch - Martha Stewart

Sunday, May 5, 2013

With Sympathy...

I must admit, these cards are definitely not the cards I like to make, but I know it will bring a little smile to the person I'm sending it to.  This was a quick card but I think it turned out cute!  I stamped this Hero Arts' image onto some SU Whisper White CS, colored it with my Copics and then cut out the image.  I punched the white lace border with my Martha Stewart border punch and adhered it across the middle of the card.  I wrapped some baker's twine around the card and then threaded it through the image and button and tied it in a bow on top.  Oh, the card base is from Amuse.  These little notecards are so nice to have on hand for whipping up a quick card.   Have a great day!  {{{hen hugs}}}


Supplies:
Stamps - Hero Arts, Paper Smooches; Copics; Baker's Twine; Card - Amuse; Button; Punch - Martha Stewart

Sunday, April 28, 2013

Mother's Day Card #1


Mornin' hens!  Are you hens ready for Mother's Day?  You know, it's only 2 weeks away!  If not, don't feel bad, I'm right there with you.  Although, I'm partially finished as I DO have my cards made at least, so that's a good thing!  Tee-hee!  This is my mother's card.  Yeah I know, she gets two cards back to back.  Lucky duck huh?  LOL!  This is another oldie but goodie pulled from my stamp stash.  This little image is from Motivet Stamps.  I'm such a sucker for CUTE STAMPS!  I stamped the image onto some SU Very Vanilla and colored the image with my Copics.  I cut the image out with my oval Nestabilities and then sponged the edges with some Distress Ink.  You can see a tutorial I did on this technique HERE.  The DP is from My Minds Eye (Darling Dear) and I stitched it to some SU Soft Suede.  I added a strip of crocheted lace and added the computer generated sentiment to the bottom.  (The insides reads, "I'd pick YOU!" Have a great day!  {{{hen hugs}}}


Supplies:
Stamps - Motivet Stamps; CS - SU Very Vanilla, Soft Suede and Sahara Sand; Copics; Nestabilities; Tim Holtz Distress Ink (Vintage Photo); Crocheted Trim; Glossy Accents

Sunday, April 21, 2013

Happy Birthday Mom!

Hi'ya hens! I hope each of you had a relaxing weekend.  I spent yesterday in my hen house stamping!  Woot-woot!  Love those kinda days!  Anyway, I made this little card for my Mom's birthday.  This is an image from Elzybell's.  SO STINKIN' CUTE!  Sadly, Ella (the designer) no longer has these stamps for sell but I see now that she's teamed up with Penny Black and has several sets available through Penny Black now.  Woo-hoo!  You can see her sets HERE!  For this card, I stamped this image onto some SU Very Vanilla CS and colored the sheep with my Copics.  I stamped the image again onto some scrap white CS and paper pieced only the white fur onto the SU Very Vanilla image.  I stitched this DP from My Minds Eye (On the Sunny Side) to some SU Cherry Cobbler.  I finished with some Stickles in a few different colors and added a little gingham bow to complete the look.  Have a great day!  {{{hen hugs}}}


Supplies:
Stamps - Elzybells; Copics; CS - SU Very Vanilla & Cherry Cobbler; DP - My Minds Eye; Nestabilities; Stickles; Ribbon

Saturday, April 13, 2013

Herd you were havin a birthday!

It's the weekend! And that's a BIG woo-hoo from me! Love, love, love the weekends..  I DO love when I can stay curled up in bed. This is a Maui Cows stamp that I just fell in love with. You hens know how much I love farm animals, right?  Ya know, here a moo, there a moo, everywhere a moo-moo! {he-he}
Ok-ok, onto the card details... I colored my little heifers with my Prismacolor markers and tried to match this DP as best as I could. I cut them out with my Classic Oval Nestie and matted onto some scrap blue CS cut with my Scalloped Oval Nestie. I finished it off with some faux paper piercing and bright red grosgrain ribbon and there you have it. Nice, bright and cheery. Just perfect for a birthday card.


Supplies:
Rubber Stamp-Maui Cows; Nestibilities; CS-Georgia Pacific White & SU Basic Black

Thursday, April 11, 2013

Happy Birthday Peyton!

Good morning hens!  Today is Peyton's FIRST birthday!  Woo-hoo!  Peyton is Cheryl's daughter (one of Lil Chick's bestest friends). She is such a cutie it's not funny! Her laugh is contagious and I could just squeeze those cheeks of hers all day!  What a doll baby she is!  Anyhoo, today is her BIG day and her birthday party is this weekend.  I can hardly wait!  Her party is a Minnie Mouse theme so I thought this card design would be perfect for the birthday girl.  I made the Minnie Mouse frame, the N and E using my Silhouette Cameo.  Then I just found a cute photo of Peyton, cut it a little smaller and adhered it inside the frame. The DP is from October Afternoon's Cakewalk and Report Card collections.  To finish, I added some sheer ribbon to make the Minnie Mouse look complete!  I think it turned out so cute, don't you?  Have a wonderful day!  {{{hen hugs}}}


Supplies: Silhouette Cameo; Border Punch - Fiskars Treading Water; DP - October Afternoon Cakewalk and Report Card; CS - SU Very Vanilla & Basic Black; Ribbon - Michael's

Sunday, April 7, 2013

Mailing Tutorial

Mornin' hens!  Today I thought I'd share a little tutorial with you on how I mail my cards.  I've received a few questions in the past regarding packaging and mailing of my cards so I thought you might find this helpful.  Enjoy!


I purchase these clear boxes from Papertrey Ink.  Click HERE to be taken directly to the Clearly Creative Card Boxes page.

Wednesday, April 3, 2013

Born to be Riled!

Mornin' hens!  If you don't know it, I'm a HUGE Maxine fan!  OMG, she's SO ME! LOL!  So as I was perusing the internet and happened to stumble upon two Maxine stamp sets, I HAD to have them! I made this card for my sister's birthday and she loved it!  It's a super simple card but cute none the less. I just LOVE Floyd!  What a hoot he is.  Ok, I hope you hens have a good day!  

Edit: I bought my two sets several months ago but I just found them on sale at The Stamp Shack HERE!  These are the "Peel and Stick" packs.  They're designed to be used with the PSA Essentials stamper but I just use them with an acrylic block instead. 


Supplies: Stamps - PSA Essentials; CS - SU Very Vanilla & Real Red; DP - October Afternoon "Sidewalk"; Ribbon - PTI; Nestabilities; Corner Chomper

Sunday, March 31, 2013

Some bunny loves you!


Mornin' hens and Happy Easter!  This is the Easter card I made for Lil' Chick and Doug!  I just love it and wow was it simple!  I started with a card base from Amuse.  I bought these a really long time ago so I'm not sure if you can still purchase them or not.  Anyway, they're super cute and make whipping up a card so quick and easy.  I stamped the little bunny image from Whipper Snapper Designs onto some Classic Crest CS and colored him with my Copics.  I cut him out and adhered him with a few dimensionals onto this paper doily.  Then to finish, I tied this polka dot ribbon into a cute little bow and stamped the sentiment onto a little tag. It just looks sweet doesn't it?  Ok, well that does it for me today! I hope you all have a blessed Easter with your friends and family!  
{{{hen hugs}}}  


Supplies:
Rubber Stamps - Whipper Snapper Designs, Verve (sentiment); Copics; Card Base - Amuse Stamps; CS - Classic Crest; Ribbon - Michaels; Paper Doily - Wilton

Thursday, March 28, 2013

Happy Birthday Dad!

Mornin' hens!  Here's a little card I made for my Dad!  Today is his 78th birthday!  Woo-hoo! Love ya Dad!  This is another stamp I pulled from my Stamps by Judith stash!  Uh yup, I have LOTS of stamp stashes! Shhhhh!  LOL!  I stamped this little guy onto some Classic Crest CS and colored him with my Copics.  I actually masked off the third balloon as it did read, "TO ME!" and I wanted it to say "TO YOU" instead, so I drew TO YOU using my Prismacolor fine markers.  The tricky part to coloring this image was the overlapping of the balloons.  I had to use colors that would reflect what the two colors of balloons would look like if you could see through them.  I think I did pretty good huh?  Like anyone would ever notice such details, right?  Oh well, we do and that's all that matters!  Ok, so then I stitched the image onto some SU Basic Black CS and then added it to this DP from Cosmo Cricket that I stitched onto some SU Basic Black and then SU Real Red.  The card base is SU Soft Suede.  To finish this card up, I tied on this cute gingham ribbon and added a bow tied with linen thread on top!  I hope he likes it!!  Have a great day!  {{{hen hugs}}}


Here's the inside:


Supplies:
Rubber Stamps - Stamps by Judith; CS - SU Basic Black, SU Real Red and SU Soft Suede, Classic Crest White; Copics; Button; Linen Thread

Monday, March 25, 2013

Here comes Peter Cottontail...

 ...hopping down the bunny trail!!  Tee-hee!  Hi hens!  Did you all have a good weekend?  Mine was very relaxing and I spent most of the weekend in my coop!  Woot-woot!  So you KNOW it was a good weekend for me right?  LOL!  So here is one of the cards I made for Easter.  This stamp is from Stamps by Judith.  I have always loved this line of stamps.  It was one of the first lines I acquired when I first started stamping.  Guess you could say that's how I got "hooked on stamping!"  {{{snort}}}


Ok, so I started my card by stamping the image onto some SU Very Vanilla CS and colored him with my Copics.  I mounted the image on some SU Early Expresso and ran my tracing wheel around the edges.  I picked this technique up from one of my idols "Anna Wight".  She's so STINKIN CLEVER!!  Ok, so then I adhered the image to this DP from October Afternoon, matted with both SU Very Vanilla and SU Early Expresso.  The card base is SU Crumbcake.  To finish, I tied on a cute brick colored button with some linen thread and added this sentiment that I printed on my computer.  Have a great day!  {{{hen hugs}}}

Supplies: 
Rubber Stamps - Stamps by Judith; CS - SU Very Vanilla, Early Expresso and Crumbcake, Linen Thread; Button; Punch - Martha Stewart; Copics; Prismacolor Pencils

Thursday, March 21, 2013

Bon Voyage!


Mornin' hens! I don't think I mentioned to you what happened to the DH and I on the night of the wedding.  Well, if you'll stick with me, I promise, this is a GREAT story!  Ok, so as Jessica and Doug were leaving the reception, she stops and whispers in my ear, "make sure to get the envelope on Lilly's gate".  (Huh???  Whatever that meant?)  So after the guests left the reception, the DH and I were all that was left besides the wedding planner and the caterers.  We had rented an Enterprise Rent a Van for the week (total lifesaver!) to haul all the stuff to the wedding from our home and then to Jessica and Doug's new home after the wedding.  So the DH and I change clothes and for the next hour loaded all those jars, gifts, signs, cake, wedding dress, luggage from the night before, etc, etc, etc. into the van.  It took about an hour to get it loaded and then we left for their home to drop it all off. I drove Doug's car and the DH drove the van.  When we got to their home, we let Lilly out to go potty and then we started unloading everything.  We had to wrap her cake and the cupcakes up and place then in her freezer.  Then I hung her wedding dress in her closet, so it wouldn't get all wrinkled, and as we were getting Lilly's things ready (she was coming home with us while they were gone) I remembered what Jessica said about the envelope.  Sure enough, there was an envelope on Lilly's gate.  The outside was addressed to "Mommy & Daddy".  So I told the DH it must be a card for us so let's read it together.  It was a Thank You card to the parent's of the bride, and it was so beautiful! 
At the bottom she signed it, "Thank you both for making my dream come true, now it's our turn to make your dream come true.  Call me now!"  
(Say what??  Helloooo?  It's 1:30 in the morning and she's on her honeymoon!!)
But we did as directed, and the DH pulls out his cell phone and calls her.  
She and Doug answer right away and we both put our phones on speakerphone.  
She tells us to go upstairs.  So we do...
She says, "See the little table in the hall?" 
I said, "Uh-huh, the one with the Minnie and Mickey Mouse dolls on top?" 
She said, "Yes, there is an envelope under them.  Open it!" 
So we do and we pulled out this paperwork.
 She says, "Read it out loud." 
As I started reading, I finally said, "I don't understand - what is this?"
They both said, "It's a Disney cruise to Alaska! We're sending you both on your dream vacation!"  
Well, needless to say we both started crying.  
We couldn't talk for awhile and then the DH said, "You didn't need to do this!"
 They said, "You both did so much making this day special for us, we wanted to give you this!" 
I had goosebumps I was so excited, and still am!  The DH and I have wanted to take this cruise for as long as I can remember, but we figured we'd have to wait until we retire and had some extra money.  But here we are, going this year!  I can hardly believe it.  Woo-hoo! 
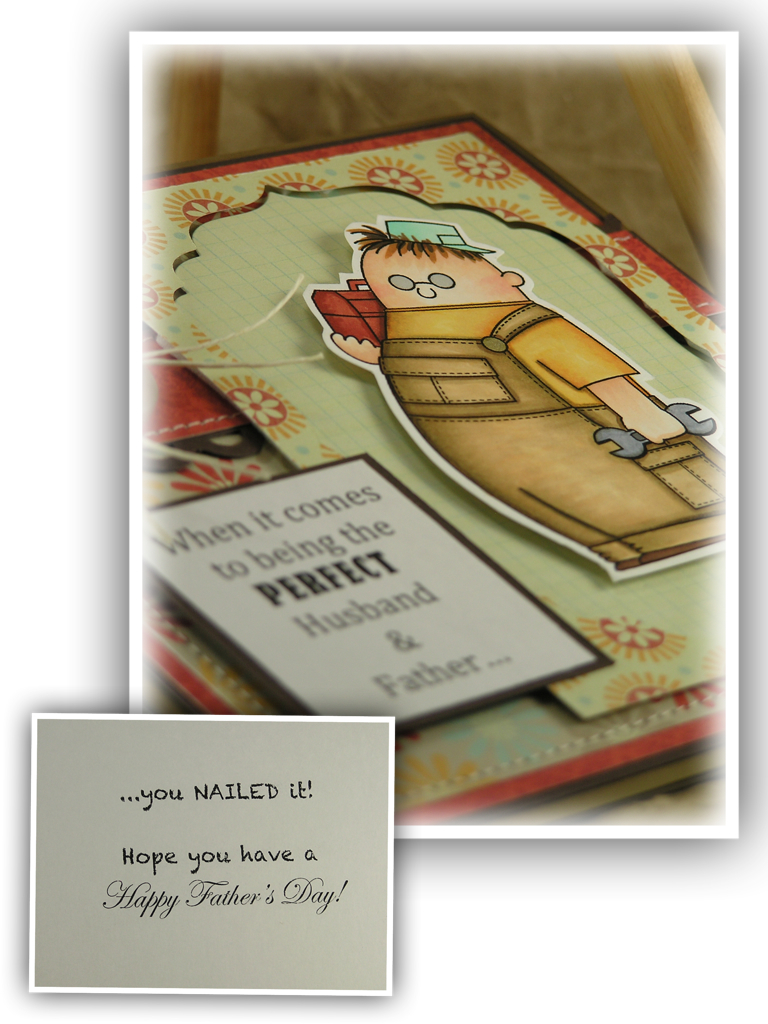
Ok, so this is where the card comes in. I made this Thank You card for the two of them.

This is the outside pocket which I made to look like a port hole. I cut the pocket, port hole, waves and ship with my Silhouette Cameo and stitched the edges closed. I added a piece
of transparency on the inside to resemble a window.  OMG, their faces look like ours must have when they told us! LOL!

This is the card itself.  The stamps I used are from two Stampin' Up sets that I have.  I think they work perfectly together.  I cut the sentiment with the Silhouette Cameo and stitched around the edges as well.  I added a half circle of CS at the top and attached a bow to make it easier to pull out of the pocket.  I LOVE how this turned out!  They did too!  
Now wasn't that a GREAT story?  I have the BEST Lil' Chick and new Son in Law ever!  I love 'em  both more than you know.  Have a great day!

Supplies: Stamps - Wilson's Words of Wisdom and Not So Seriously by Stampin Up; Copics; Transparency; DP - Echo Park; CS - SU Very Vanilla, Grey, Turquoise, various shades of Blue, Ribbon - Stampin Up, Silhouette Cameo; Glossy Accents; Nestabilities

Sunday, March 17, 2013

Crafting with my Cameo

Mornin hens!  Today I thought I'd share some of my craft projects I've done with my Silhouette Cameo.  Honestly, I've never bought a crafting tool as versatile as this one is.  No special tools or extra things to buy, just one machine and my computer.  Granted, you do purchase the images, but only the ones you want and for .99 cents, who can beat that?  Once you have the image, you can re-size to whatever size you need and use it over and over again (for personal use of course). And if you subscribe to the Silhouette store, you can get the images for a reduced price.  Woo-hoo! As for the lettering that you see me use a lot, I did not purchase those.  The Silhouette Cameo will cut any font you have on your computer. Great right? Of course from the multitude of wedding photos I've shown you, you know this machine got a "work out" during the wedding, but believe it or not, I haven't shown you everything yet!  LOL!  Here are a few other items I made....
  

I made insulated water glasses for each of the girls in the wedding party.  I don't know why, but I didn't take photos of them all.  Duh! This one was for the wedding planner.  Her favorite colors are pink and black.  The other girls' cups were done in whatever color vinyl that matched their dresses.  Jessica's was done in white or course, mine in brown, and so on.  The polka dots were in peach, tan and cream to match the colors of the wedding and each dress design was a little different depending on what style dress they wore. Jessica gave these to the girls on the day of the wedding.


I also made shirts for the girls to wear for the bachelorette party.  Jessica and her friends went to Disney World for the weekend.  Jessica wore her Minnie Mouse bridal veil and they each wore their matching shirts that read, "Bride & Co".  I cut the letters and ring design from iron on transfer paper using my Silhouette Cameo, and then ironed it on each shirt. The girls LOVED them!


I even made my gift tags last Christmas using my Silhouette Cameo.  I cut the shape and snowflake design from Kraft CS and then sponged some distress ink around the edges of each one. I made several with a Christmas tree design too but failed to snap a picture of those. Super simple and it looked so cute with my Kraft Christmas boxes and handmade bows. 


I saw this idea on Pinterest but decided to make it even cuter by using this adorable Santa face I found in the Silhouette store.  I peeled the labels off of the Germ-X bottles and made sure all the glue was removed.  Then I cut the pieces from different colors of adhesive vinyl and adhered them onto each bottle and spelled "Santa-tizer" for the back of each.  LOL!  I finished with a little bow tied with red and green ribbon, and placed them in everyone's stocking for Christmas.  Cute huh?  These are just a few of the bazillion ideas out there that can be done with this AWESOME tool!  I can't tell you how much I LOVE this thing, but if you're on the edge about whether to buy it, DO it!  You won't be sorry.  Have a great day!


Wednesday, March 13, 2013

The DH's BDay card!


Bet you'll never guess how old the DH is?  Huh?  How'd you know?  Tee-hee!  The inside reads, "...when an 'all nighter' means not having to get up to pee!"  Bwah-ha-ha-ha-ha!  Oh man, that's a good one right?  This is Gus from Bugaboo Stamps.  I just love that face of his, not to mention those fabulous legs!  Oh man, I better stop before I wet my pants too!  LOL!  Have a great day!

Supplies: Digital Image - Bugaboo Stamps; Copics; CS - SU Soft Suede; DP - Echo Park "Note to Self"; Twine; Glossy Accents; Distress Ink.

Saturday, March 9, 2013

Go ahead...

..touch my coffee and see who gets hurt!!  LOL! OMG, that's so me!  I do LOVE my morning coffee!  Can't live without it.  :o)  This is Gus again, see I  told you I LOVED him!  Super simple card I made for Doug's birthday.  Ya think I might give him a complex making him a birthday card with an OLD man on the front?  LOL!  If so, he don't know me vewy well, do he?  


Supplies: Digital Image - Bugaboo Stamps; CS - SU Basic Black; Copics; Ribbon - Stamp Simply Ribbon; Glossy Accents