Monday, February 25, 2013

Valentine's Day Card #2

Mornin' hens!  Here is card #2 of the three that I made this year.  This card is for my NEW son in law Doug!  Again I used a Penny Black image from the same collection and colored him with my Copics.  I  cut the card shape with my Silhouette Cameo and backed the front with some SU Real Red CS.  I stamped the sentiment on some scrap white CS and adhered it under the ribbon. It's hard to tell in the photo, but I did add some red Stickles to the tops of the roses for some sparkle.  I finished it off with some Kraft colored grosgrain ribbon I picked up at My Favorite Things (awesome store by the way!) and added a red button tied on with some linen thread.   That's all for today!  Stay tuned for the final Valentine card for my DH!  


Supplies: Stamp - Penny Black; CS - SU Crumbcake and Real Red, White; Copics; Stickles; Button; Linen Thread; Ribbon - MFT; Silhouette Cameo; Silhouette Studio

Thursday, February 21, 2013

Valentine's Day Card #1


 Mornin hens!  Yeah, I know I'm a little late on posting these but I thought you'd like to see them anyway.  This little one was for Lil' Chick. I thought the little girl looked like she was blowing kisses and just had to use it.  This little image is from Penny Black.  I do love her images.  They're SO CUTE!  Of course you hens know I'm a sucker for Kraft card stock so I started with SU Crumbcake and using my Silhouette Cameo, cut out the card shape, including the hearts, and the Hugs & Kisses phrase from SU Real Red CS.  I added the DP on the inside so it would peek through the open hearts, and finished with this striped grosgrain ribbon.  Mwah! to my Lil' Chick!


Supplies: Stamp - Penny Black; CS - SU Crumbcake &; Real Red; Copics; Ribbon - Stamp Simply Ribbon; DP - Echo Park "So Happy Together"; Silhouette Cameo; Silhouette Studio

Sunday, February 17, 2013

Lil' Chick's Wedding Pics

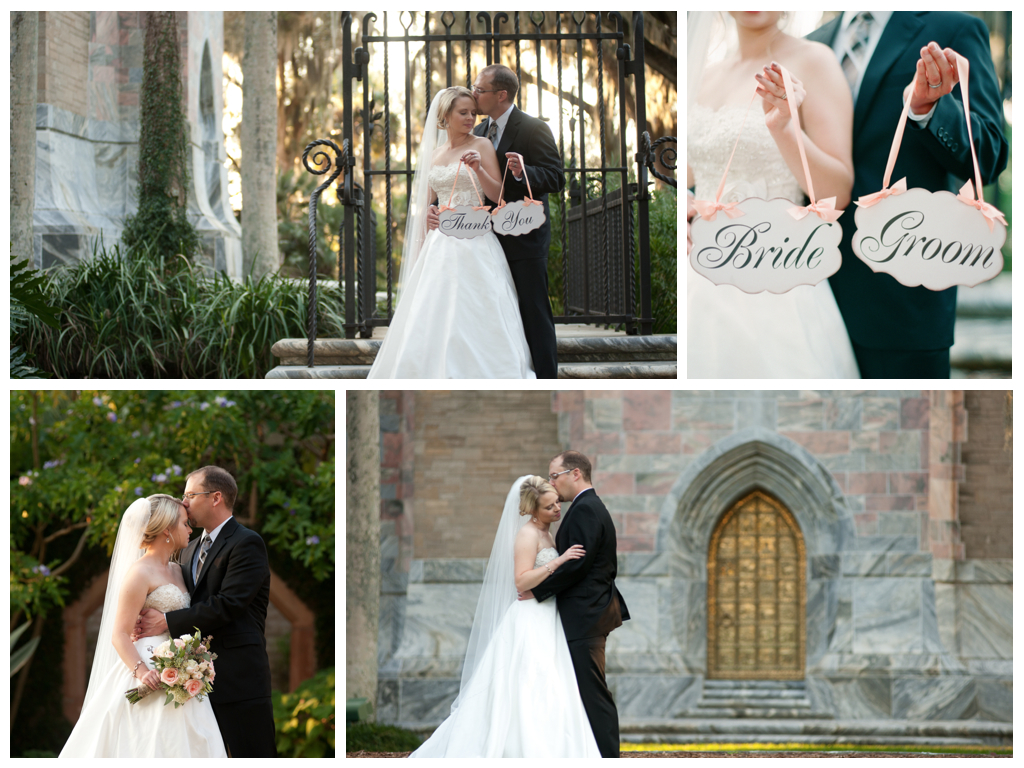
OMG!!  I'm SO STINKIN excited about these photos.  Seriously, I couldn't wait for you hens to see them.  I know I told you a little bit about the BIG day but the proof is in the pudding as they say.   These photos are the work of the ever so talented Julie Brewer, of Brewer Photography and Videography.  Here are my favorites.....  

I just loved how the photographer thought of hanging the dress.  Jessica ordered this cute hanger off of Etsy and she wore these adorable ballet flats with her dress since we didn't want to worry about heels sinking in the grass.


Of course you hens remember this hanky from the bridal shower right? She carried it in the pocket of her wedding dress.  Uh-huh, her dress had pockets!  How cool is that?  The next photo is the six pence I gave her to place in her left shoe.  "Something old, something new, something borrowed, something blue, and a six pence in her shoe!" I didn't realize there was a fifth verse to this old poem.  As I was Googling the poem, I found it, so then I had to find out what a six pence was! It's a British coin and was last produced in 1967.  I found a company that sold them and ordered one for her.  It came on the little gift card you see here and the next photo is of it placed in her left shoe.  The last photo is of me placing her veil in her hair.

These were taken just before the ceremony.  The photographer told Jessica that she was GLOWING through the viewfinder in her camera.  I totally agree!

Here are a few of my craft projects and the beginning of the ceremony.  The first photo is a sign the DH and I made together.  Jessica bought this tall black photo frame and the DH painted it with cream crackle paint.  Then he took the glass out and replaced it with a piece of backer board painted with flat black paint. He actually built this stand by cutting and re-welding an old realtor For Sale sign. I cut the vinyl lettering using my Silhouette Cameo. Oh, and I made the chair signs too!  The junior usher and flower girl are my brother's children.  SO CUTE!  Love the rose petals lining the aisle don't you?

These were taken during the ceremony.  It was such a gorgeous day and the ceremony was beautiful.  Not a dry eye in the place, not even Doug's.  (Did I mention I LOVE my new son in law?)

These were taken after the ceremony on the grounds of the gardens.  This was the most gorgeous venue ever!  The Mr & Mrs signs were made using paint stirring sticks from Home Depot and the DH painted them black for me.  I then printed the signs on card stock and glued chipboard to the backs to make them sturdy.  Then I cut the shape and attached them to the sticks.  Aren't they a lovely couple?

Jessica bought these little signs at Michaels and I sponged some distress ink around the edges and removed the boring white ribbon and used some peach ribbon instead, tying a few bows on each end.
The last photo was taken at the base of Bok Tower.  I LOVE that golden door. They play carillon bells every hour and after the wedding the bells rang from the top of the bell tower.  

Here we are, the DH and I with Doug and Jessica.  Jessica told me she didn't want me to be like every other MOB, so she had a nosegay made for me instead of a corsage.  I LOVED that!  I don't know how she did it, but for my pre-ceremony gift she gave me a small clutch to carry that matched my dress exactly! She's so thoughtful. The two MOH's are Jessica's best friends, Cheryl and Alicia and the BM is Matt, Doug's best friend. The last two photos are of my mother and father, and DH's mom (i.e. my favorite mother in law).

Now comes the reception.  The little chalkboards came from Oriental Trading and I added vinyl lettering using my Silhouette Cameo.  There were nine different cupcake flavors and they were oh so yummy. The DH angled the bottom of each sign so they would tilt back and then added little stands on the back of each one so they wouldn't fall over.  The favors were made using printed transparencies and attaching them to a 3x3 box lid made from SU Very Vanilla CS using 3 brads on each side. We filled them with cream shredded paper and Hershey's Hugs and Kisses.  Then punching two holes at the top of the transparencies, we attached the little tag with some thread and tied the peach ribbon in a bow.  The next photos are of the cake topper, the cupcake table and then the menus we made which doubled as wraps for the silverware and linen napkins.  Cute idea huh?

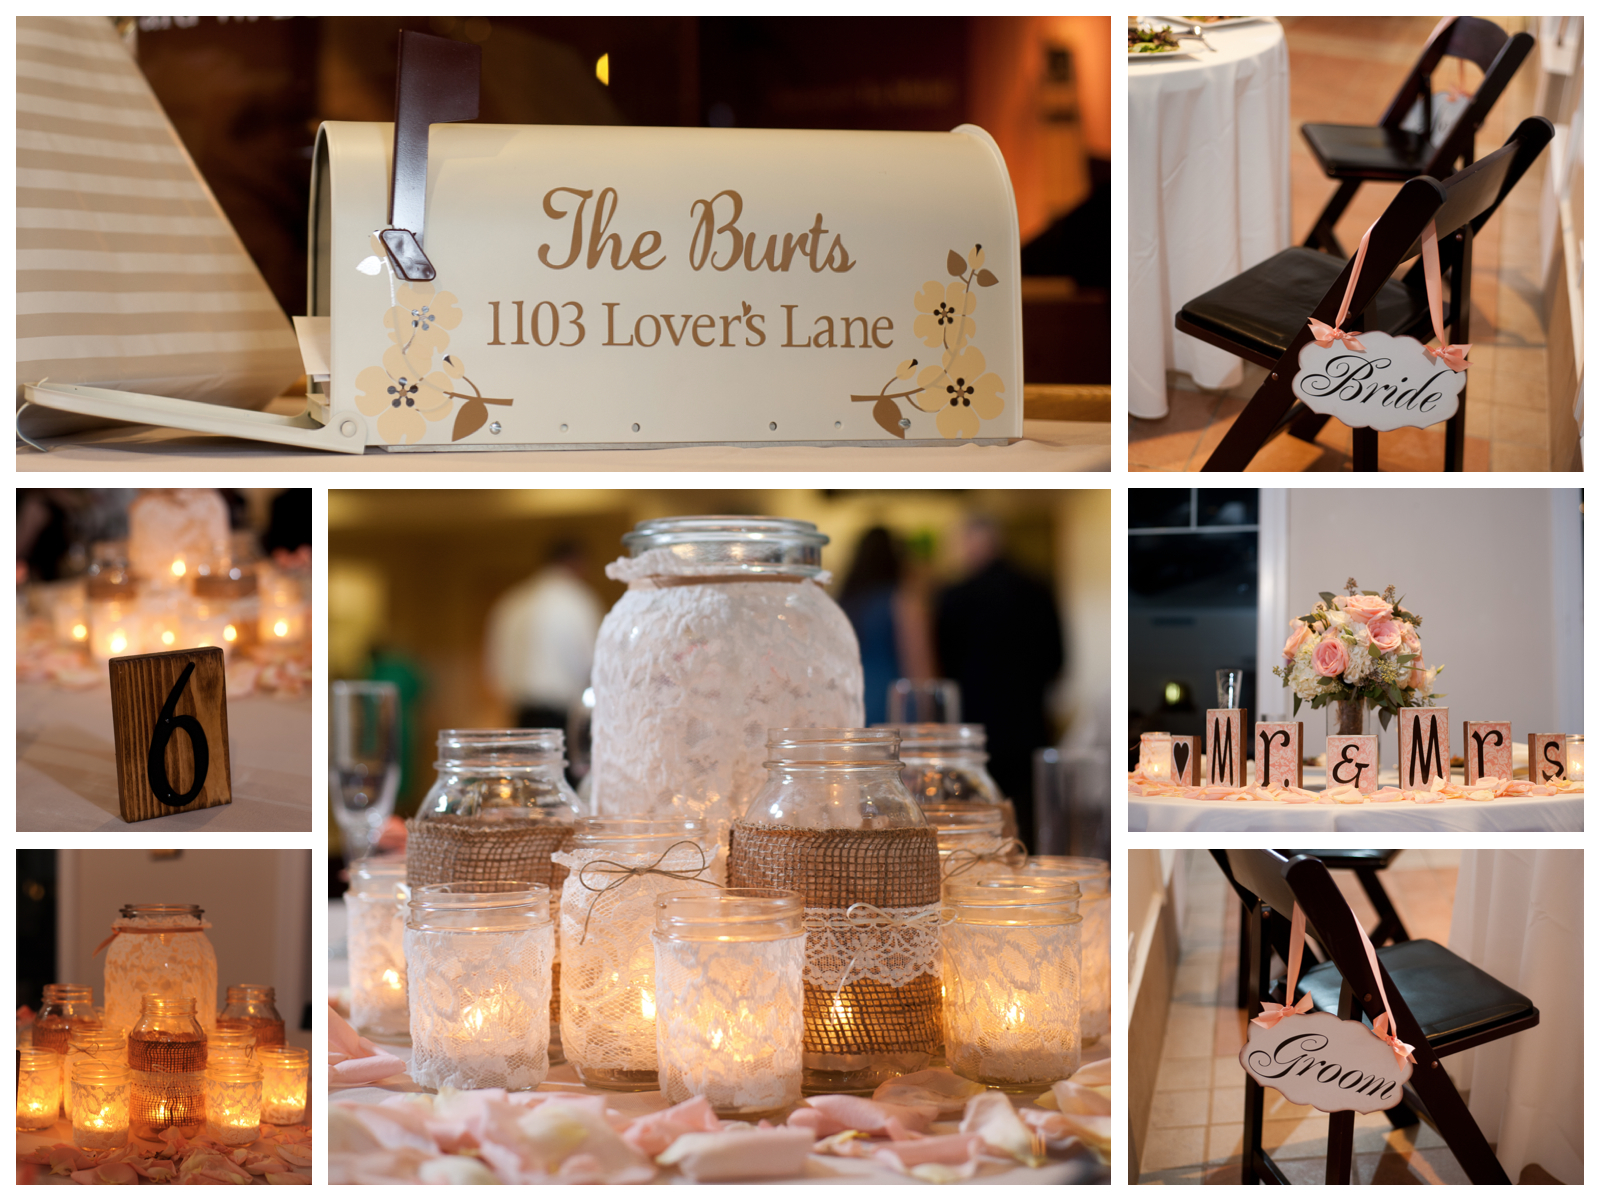
This is the mailbox the DH and I made together.  This was sitting on the gift table for the guests to place their cards in.  The DH painted it cream with a brown flag (it was black with a red flag) and I cut the vinyl flowers and letters using my Silhouette Cameo.  The table numbers were made by the DH too!  Like the cupcake signs, he cut the base of each on an angle and made little stands on the back of each one too.  Then he sanded and stained them all before attaching the numbers.  The centerpieces were made using all different sizes of mason jars (Uh-huh, 175 of them!).  We covered them with different styles of lace and burlap, and added twine and ribbon as well.  Then we hot glued long burning tealight candles inside the bottom of each one (so they would stay in the center of each jar).  The Mr & Mrs. sign on the sweetheart table was made by my good friend Jen, from The Olde Willow. She used the same DP we used for the invitations and Mod Podged it to the wood blocks! Adorable!

Another sign I made using my Silhouette Cameo.  Jessica's bouquet was used as the centerpiece on the sweetheart table. Talk about thinking of everything, we did! LOL!  The guestbook was made by Jessica and I at the LAST MINUTE (and I mean last minute!) as Hurricane Sandy prevented us from receiving the photo book that was to be used as the guestbook.  We bought this SMASH book from Michaels and we decorated the outside with lace, ribbon and a fabric rose and even added their names to the front to cover the SMASH label.  We printed her engagement photos and made a quick scrapbook for the guest to leave their warm wishes to the happy couple in.  Actually, it turned out super cute and Jessica loved it even more because we made it together!

The happy couple's first dance, and the DH and Jessica rocked the house with their SURPRISE father-daughter dance!  LOL!  It was a hoot!

More photos of their dance and a special HUG for daddy's little girl.  Yup, she has him wrapped around her little finger.  Tee-hee!

Here are a few of the DH and I dancing, Doug leading the crowd with "the Dougie" (OMG! That was SO FUNNY!) and Jessica and Doug playing the shoe game.  I had never seen this before but it was hilarious!  As you can see, they DISAGREE.  {{{snort!}}} And the last is of the two of them eating cake.  Aren't they cute?

My nephew and niece showing off their dancing skills. LOL! And finally the send off!  Everyone lit their sparklers and held them high as the happy couple ran between them to their awaiting limo.  They left for Napa Valley, California where they spent their honeymoon.  Ok that's it!  I hope you enjoyed re-living Lil' Chick's special day with me.  It was such a beautiful wedding and it warms my heart seeing the two of them so happy together. Ahhhh love, ain't it wonderful...


Friday, February 15, 2013

The Wedding Invitation

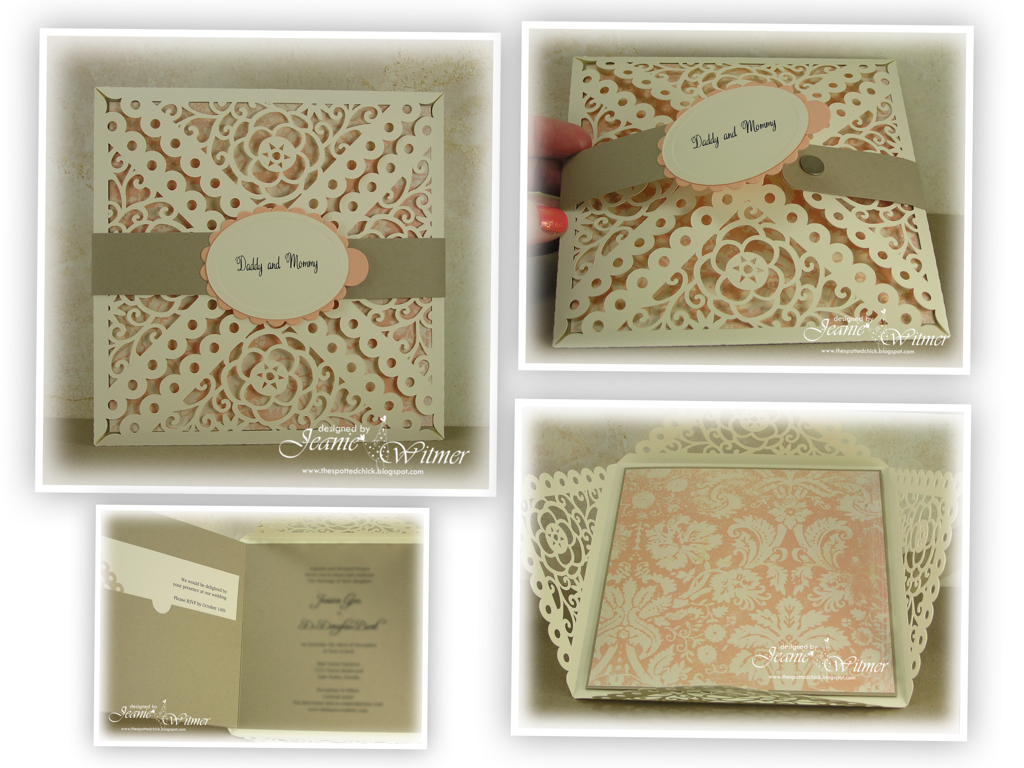
Hi hens!  Sorry for being so quiet lately, but I've been so busy doing NOTHING!  LOL!  Honestly, it's hard getting back into the swing of things.  Hey, this lazy thing is something I think I could get used to.  {{{snort!}}}   Look out retirement, here I come!  Tee-hee!  (Seriously, I can't wait!) Ok-ok back to business...  I was going through some of the photos that I haven't edited yet and I had forgotten to show you hens the wedding invitations I made.  They were quite complex but I think they turned out gorgeous.  


I saved mine of course, so this is the one I used for the photos.  The wrap was done with my Silhouette Cameo.  The band is held shut with a tiny magnet under the tab.  Each invitation was personalized with the recipient's name on the medallion. As you open the four sides of the wrap, the card opens to the left to unveil a pocket containing the RSVP postcard.  Clever huh?  The invitation is printed on the right side which is actually attached to the wrap itself, to prevent the card from shifting inside.  Honestly, they were so pretty, and of course one of a kind!  Love that!

Supplies: Cardstock - SU Very Vanilla and Crumbcake, Silhouette Cameo, Nestabilities (oval and scalloped oval), circle punches

Friday, January 18, 2013

When Jean speaks...

...EVERYBODY listens!!  LOL!  Boy it sure looks like she's fighting mad don't it?  What a hoot she is.  This is "Sound off Jean" from Art Impression's Golden Oldies stamp line.  AI is one of my favorite collections.  I just love any image of an OLD person.  Ya know, they make the BEST birthday cards!  Bwah-ha-ha-ha!  This card was for my BESTEST friend LouLou.  The inside reads, "you can fart, pee, laugh and sneeze all at the same time!"  OMG, isn't that GREAT?  Ahhhh, it still makes me laugh, and fart, and pee and sneeze!!  Tee-hee!  Anyhoo, I colored Jean (just needs an "ie" on the end of her name and she'd be perfect - Pffft!) with my Copics and stitched her to some SU Soft Suede CS.  I matted the DP with some grey CS and then tied some crocheted ribbon around the bottom.  I printed the sentiment on my computer.  Oh and of course, I applied some Glossy Accents to her glasses.  LOVE IT!


OMG, did you notice her shoes?  Man, those little pigs are the BEST!  It just keeps gettin' better and better!  LOL!  Have a great day and I'll see ya back in the hen house real soon!

Supplies:
Stamps - Art Impressions; Copics; CS - SU Soft Suede & Grey; Crocheted Ribbon; Glossy Accents

Wednesday, January 16, 2013

Happy Anniversary!

Hi there!  Are you hens having a good week!  Well, it's HUMP DAY!  Woot-Woot!  We're half way to the weekend!  This is my honey's anniversary card.  Man, I do LOVE this card!  Of course, just using Kraft colored cardstock makes me love it even more, but it is CUTE right?  These little images are from   the Twitterpated set from Verve Stamps.  That's where I got the idea to frame this image with dashed lines and the little hearts.  SUPER CUTE idea!  I colored the images with my Copics and paper pieced their clothes.  I attached them to the SU Crumb Cake CS with dimensionals and then drew on the dashed lines and hearts.  I matted the card with some SU Basic Black CS and then added the little one inch squares at the bottom to coordinate with their outfits.  Oh, and this set is on sale for $14.40 if you're interested. I LOVE it those cute little faces!  Tee-hee!  


Ok hens, I hope you all have a great day and I'll see ya back in the hen house real soon! 

Supplies:
Stamps - Verve Stamps; CS - SU Crumb Cake & Basic Black; Copics; DP - My Minds Eye

Monday, January 14, 2013

ConGRADulations!

Morning hens!  This is a little card I made for my niece
who graduated last year.  These little images are from the Smarty Pants set over at Paper Smooches.  I colored them with my Copics  and paper pieced the professors shirt. Of course, you can't have glasses without some Glossy Accents right? Love it!  I matted the DP with some SU Basic Black CS and stitched around the edges.  I  attached them to the DP with a few dimensionals and tied on this cute striped ribbon.  I stamped the diamond pattern on the bottom with one of the patterns from the Debonair stamp set and placed little gold beads in the center of each diamond.  Last but not least, I rounded the corners with my Corner Chomper.  Love that thing!


I also made this cute little box that looks like a mortarboard. Bet you'll never guess how I made it?  Hmmmmm???  How'd you know?  Yup, my Silhouette Cameo!!  Then I just attached some yellow grosgrain ribbon to the bottom of the round cup and threaded it through the top.  


I stuffed it with some shredded paper and placed her earrings and necklace inside. Love it! 

Supplies: Stamps - Paper Smooches; Copics; Adhesive Beads - Michaels; Glossy Accents; CS - SU Crumb Cake & Basic Black; Template - Silhouette America; Ribbon - Stamp Simply Ribbon Store (Striped Grosgrain), Offray (Yellow Grosgrain)

Friday, January 11, 2013

Christmas Ornaments

Good morning hens!  I know this is late but I thought you'd like to see them anyway.  These are ornaments I made using dried flowers from Lil' Chick's wedding.  Her flowers were peach roses and so pretty.  Anyway, my sister in law saw this idea on Pinterest and sent it to me.  I knew I HAD to make it for Lil' Chick.  Once again, I busted out the trusty Silhouette Cameo and typed in Doug & Jessica and the date of their wedding.  I cut the names and date from white adhesive vinyl. I bought these glass ornaments from Michael's and filled them with the dried flowers.  What a great idea, right?  Needless to say, Lil' Chick LOVED it!   That makes me smile!


I had flower petals left over, so I decided to make one for myself.  I did mine in beige vinyl letters and used the actual ribbon from my bouquet.  So cute!


Supplies: Glass Ornaments - Michaels; Adhesive Vinyl - Silhouette America; Ribbon

Wednesday, January 9, 2013

Lil' Chick's Birthday Card

How appropriate right?  I LOVED how this card turned out.  Of course you can't go wrong with any Whipper Snapper Designs image.  They're just so STINKIN CUTE!  I colored "Farm Girl" with my Copics and stitched her on some SU Cherry Cobbler CS.  I stamped Happy Birthday on some velum and attached it with a couple of silver brads.  To finish, I added some polka dot ribbon tied in a cute bubbly bow. 

I hope you like it. Be sure to leave a comment below (I miss you hens!) and I'll see ya back in the hen house real soon. Have a great day!

Supplies: Stamp - Whipper Snapper Designs; CS - SU Cherry Cobby; Copics; Brads and Ribbon.

Monday, January 7, 2013

Happy Birthday Bobby!

Mornin hens!  Today is my older brother's birthday.  I made this simple card for him and stuffed in a gift card to his favorite restaurant.  Have I told you hens how much I LOVE my Silhouette Cameo?  Holy cow, I know I couldn't have done all the crafts for the wedding without it, that's for sure.  It's AMAZING and has become an invaluable tool for my crafting.  With that said, I downloaded the template for this card and it cut out the card with the word Happy Birthday on the front.  Yup, it does it all.  It even scores it where it should be folded.  Ahhhhhhhh!  Ok, so then I backed the front of the card with some DP by October Afternoon and added some baker's twine on the left.  Next, I colored this cute little image from Whipper Snapper Designs called "Take the Cake Turtle" with my Copics and added some Stickles to the candles.  That's it!  Super simple and Super cute too!  
Hope you hens have a great Monday!


Supplies: Stamps - Whipper Snapper Designs; CS - Taylored Expressions; Template Design - Silhouette America; Copics; Bakers Twine - Hobby Lobby; Stickles; DP - October Afternoon Cakewalk

Sunday, January 6, 2013

The Bridal Shower

Hi there!  Sorry for the delay in my posting but I came down with pneumonia just before Christmas!  OMG, I was SO SICK!  The doctor put me on some antibiotics and I'm doing better each day.  Whew!

So, back to my story....  Well, Lil' Chick's bridal shower was absolutely the PRETTIEST thing ever.  Her two maid of honors did an AMAZING job too! They planned a surprise English Tea Party to be held at a quaint Bed & Breakfast inn.  The Bed & Breakfast Inn was an old 3 story home that was just gorgeous.   Lil' Chick had no idea where or what the theme of the shower was.  All she knew was she had to wear a dress.  LOL!  I picked her up at her apartment and of course she kept asking where are we going, where are we going!  I wouldn't tell her!  Tee-hee!  Once I turned down the street of the Inn, she knew the location was the Bed & Breakfast Inn as she and one of her Maid of Honors had eaten lunch there before.  She started squealing she was so THRILLED!!!!  Everyone had a great time and Lil' Chick was so happy.  Here are some of the photos from that day....

This is as we were walking in. (Shhhh!  Everyone is waiting inside for her.)
This is the little sign that was in the garden outside.
Everyone yelled SURPRISE as she walked in.  She was SO EXCITED to see everyone in hats!! 

This is Alicia, Cheryl and Lil' Chick!  Alicia & Cheryl are her two Maid of Honors. 
This is how the room was decorated for the Tea Party.  So cute!!

The cupcake and hors d'oeuvre table.  I made the Bride to Be sign out of chipboard and stained doilies.

The cupcakes were decorated with teacups and Vera Bradley purses. LOL!

Yummy!
These are little "ham roll ups".  Lil' Chick's FAV!!
Jessica and her little cousin Madilyn.

Gotta get the pinky right!! {{snort!}}


By george, I think she's got it!!

I LOVE black & white photos!!  

Love that smile!

Time for presents!!  I asked that they save my presents for last.  I wrapped each box bottom and top individually so she could just lift off the box top and leave the bow in tact.  Everyone moaned, "Good grief!  That's Jeanie for ya!"
Tee-hee!

The first gift was a box of Thank You notes, envelopes, and stamps.  I also included a shower invitation
(yep, I made those too!) for her to keep. She's holding up the shower invitation. 
The Thank You notes coordinated with the invitation with little tea pots and a doily.
Now for the last gift.  Here's a close up of my wrapping.... :)
This is the poem I laid inside...


This is a piece of my wedding gown and the lace is from my train.  I had her NEW initials embroidered on the piece and then I made the hanky for her.  I was quite proud of myself for how well I mitered those corners too!
It turned out beautiful. She carried it on her wedding day!

I think she LOVED it!  What do you think?
Actually, she came right over to me and gave me the biggest hug.  We were both crying then.

One thing I can say about my little girl, she has a deep sense of appreciation, which I love.
She was SO TOUCHED by my gift.  That meant the world to me.  I LOVE my Lil' Chick SO MUCH!
Such pretty ladies!

My sister, my mother and me in our hats!  Woot-woot!  What fun we had!

We all LOVED the location and theme and had such fun getting all dressed up in our dresses and hats! I found that I LOVE, LOVE, LOVE cream in my tea!  Who'd have thunk? And lemon curd is AWESOME!  You think there's a job as a taste tester in Buckingham Palace in my future??? Hmmmm???